The Open Book
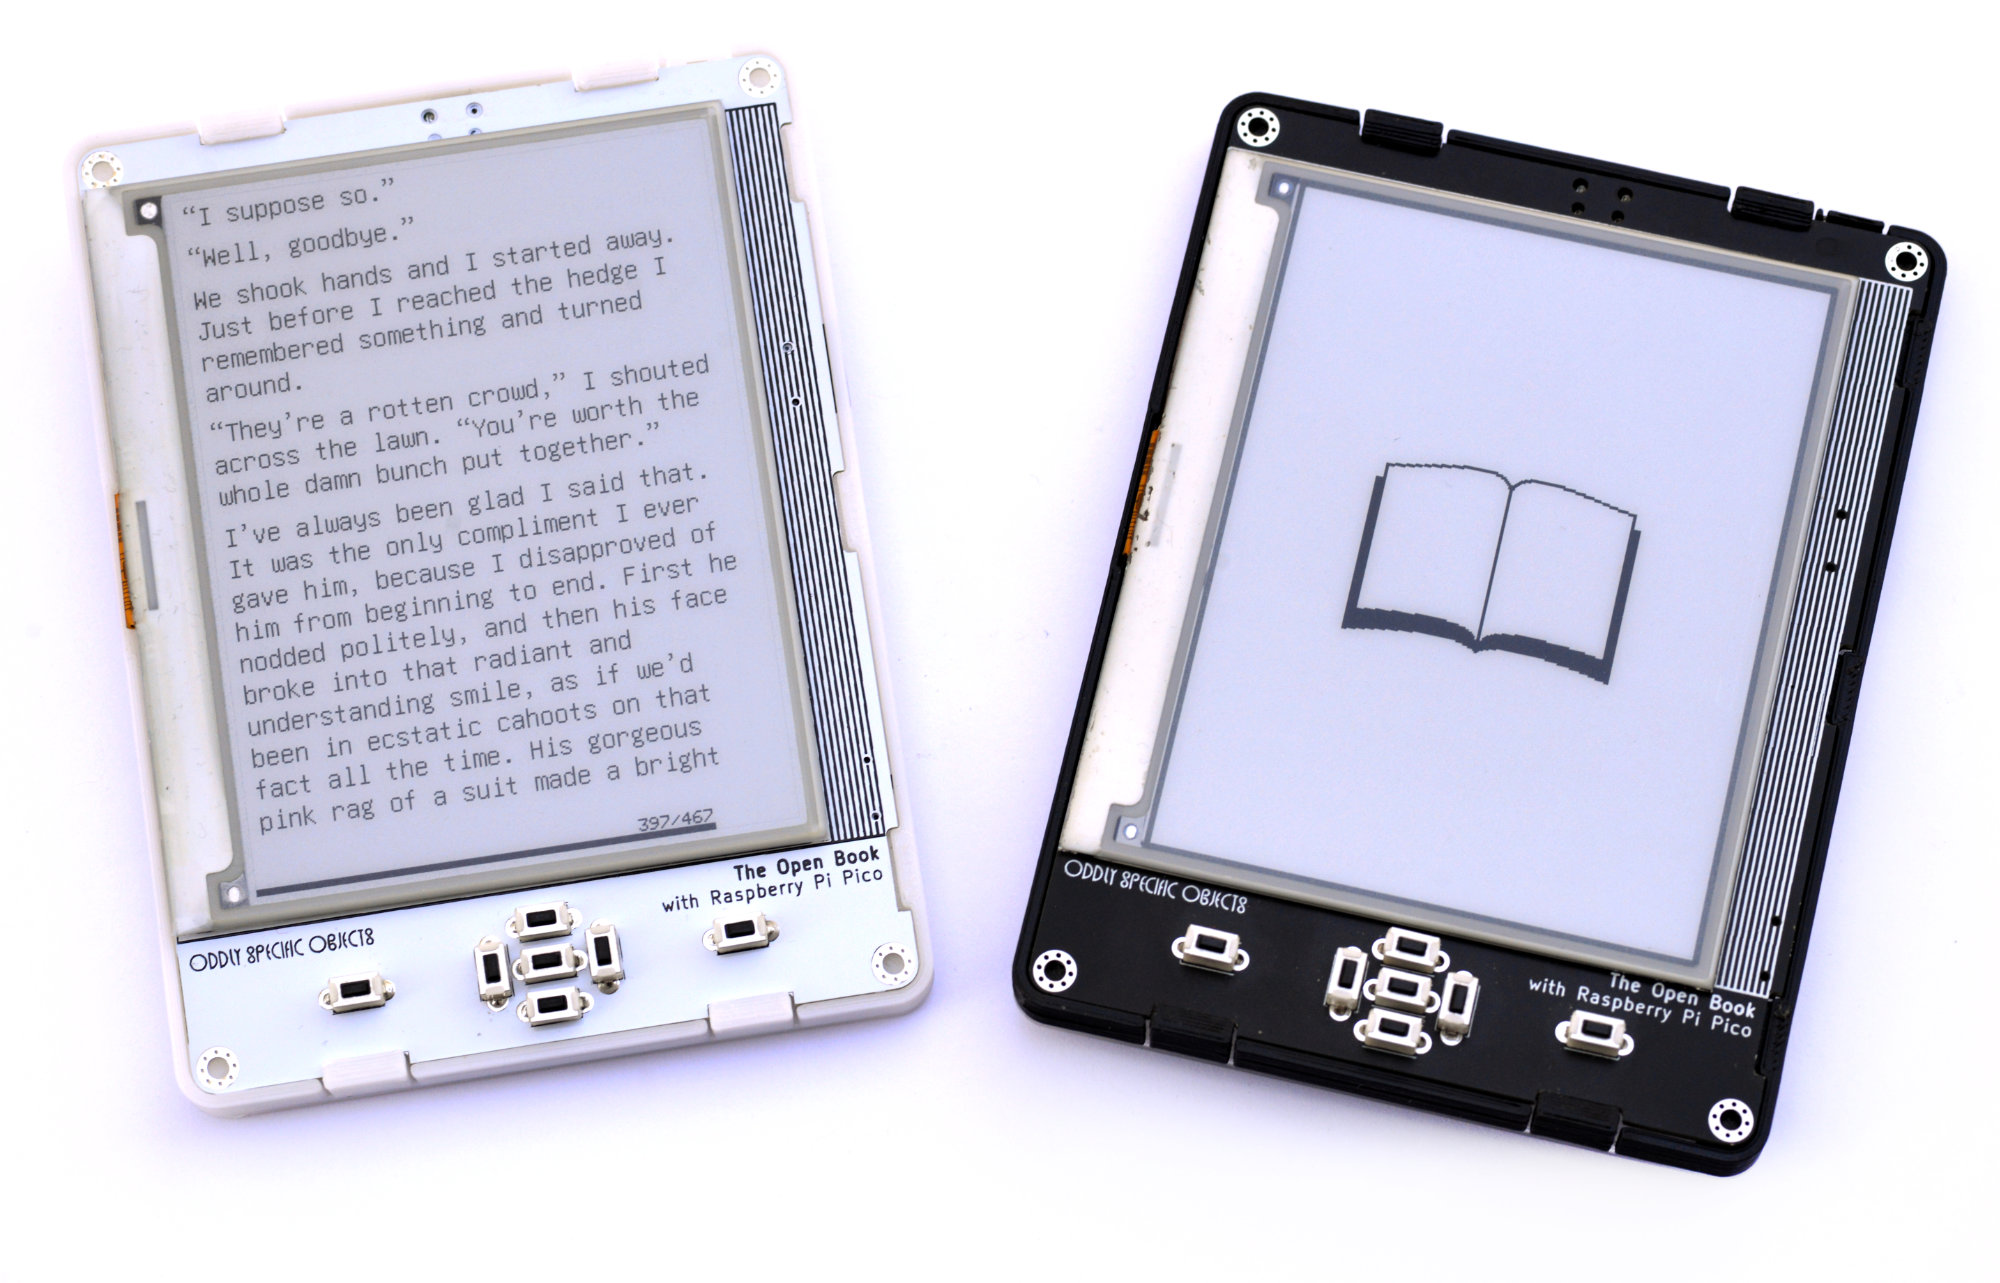
The Open Book is my long-standing attempt to design a comprehensible and accessible e-book reader that you can build yourself (or at least have manufactured affordably). The current edition is something I’m calling the “Abridged” or “Developer Preview” edition. It’s designed to be incredibly simple: there are 7 through-hole and 14 surface mount components, nearly all in a chunky 1206 package that’s easy to hand solder. The tradeoff is that it has no LiPo charging circuit; instead it uses AAA batteries, making it a bit more chunky than previous versions of the book.
The goal with this version is to get hardware in hands so we can start hacking on firmware.
- If you need to buy parts, skip to Getting the Parts.
- If you already have a kit, skip to Assembling the Book.
- If you already built your book and need to work through software stuff, skip to Flashing the Firmware.
- Once you’ve got a functioning Open Book, move on to Using your Open Book.
- Finally, if you’ve still got the energy, you can Convert Books to Text to read on your Open Book.
How it Works
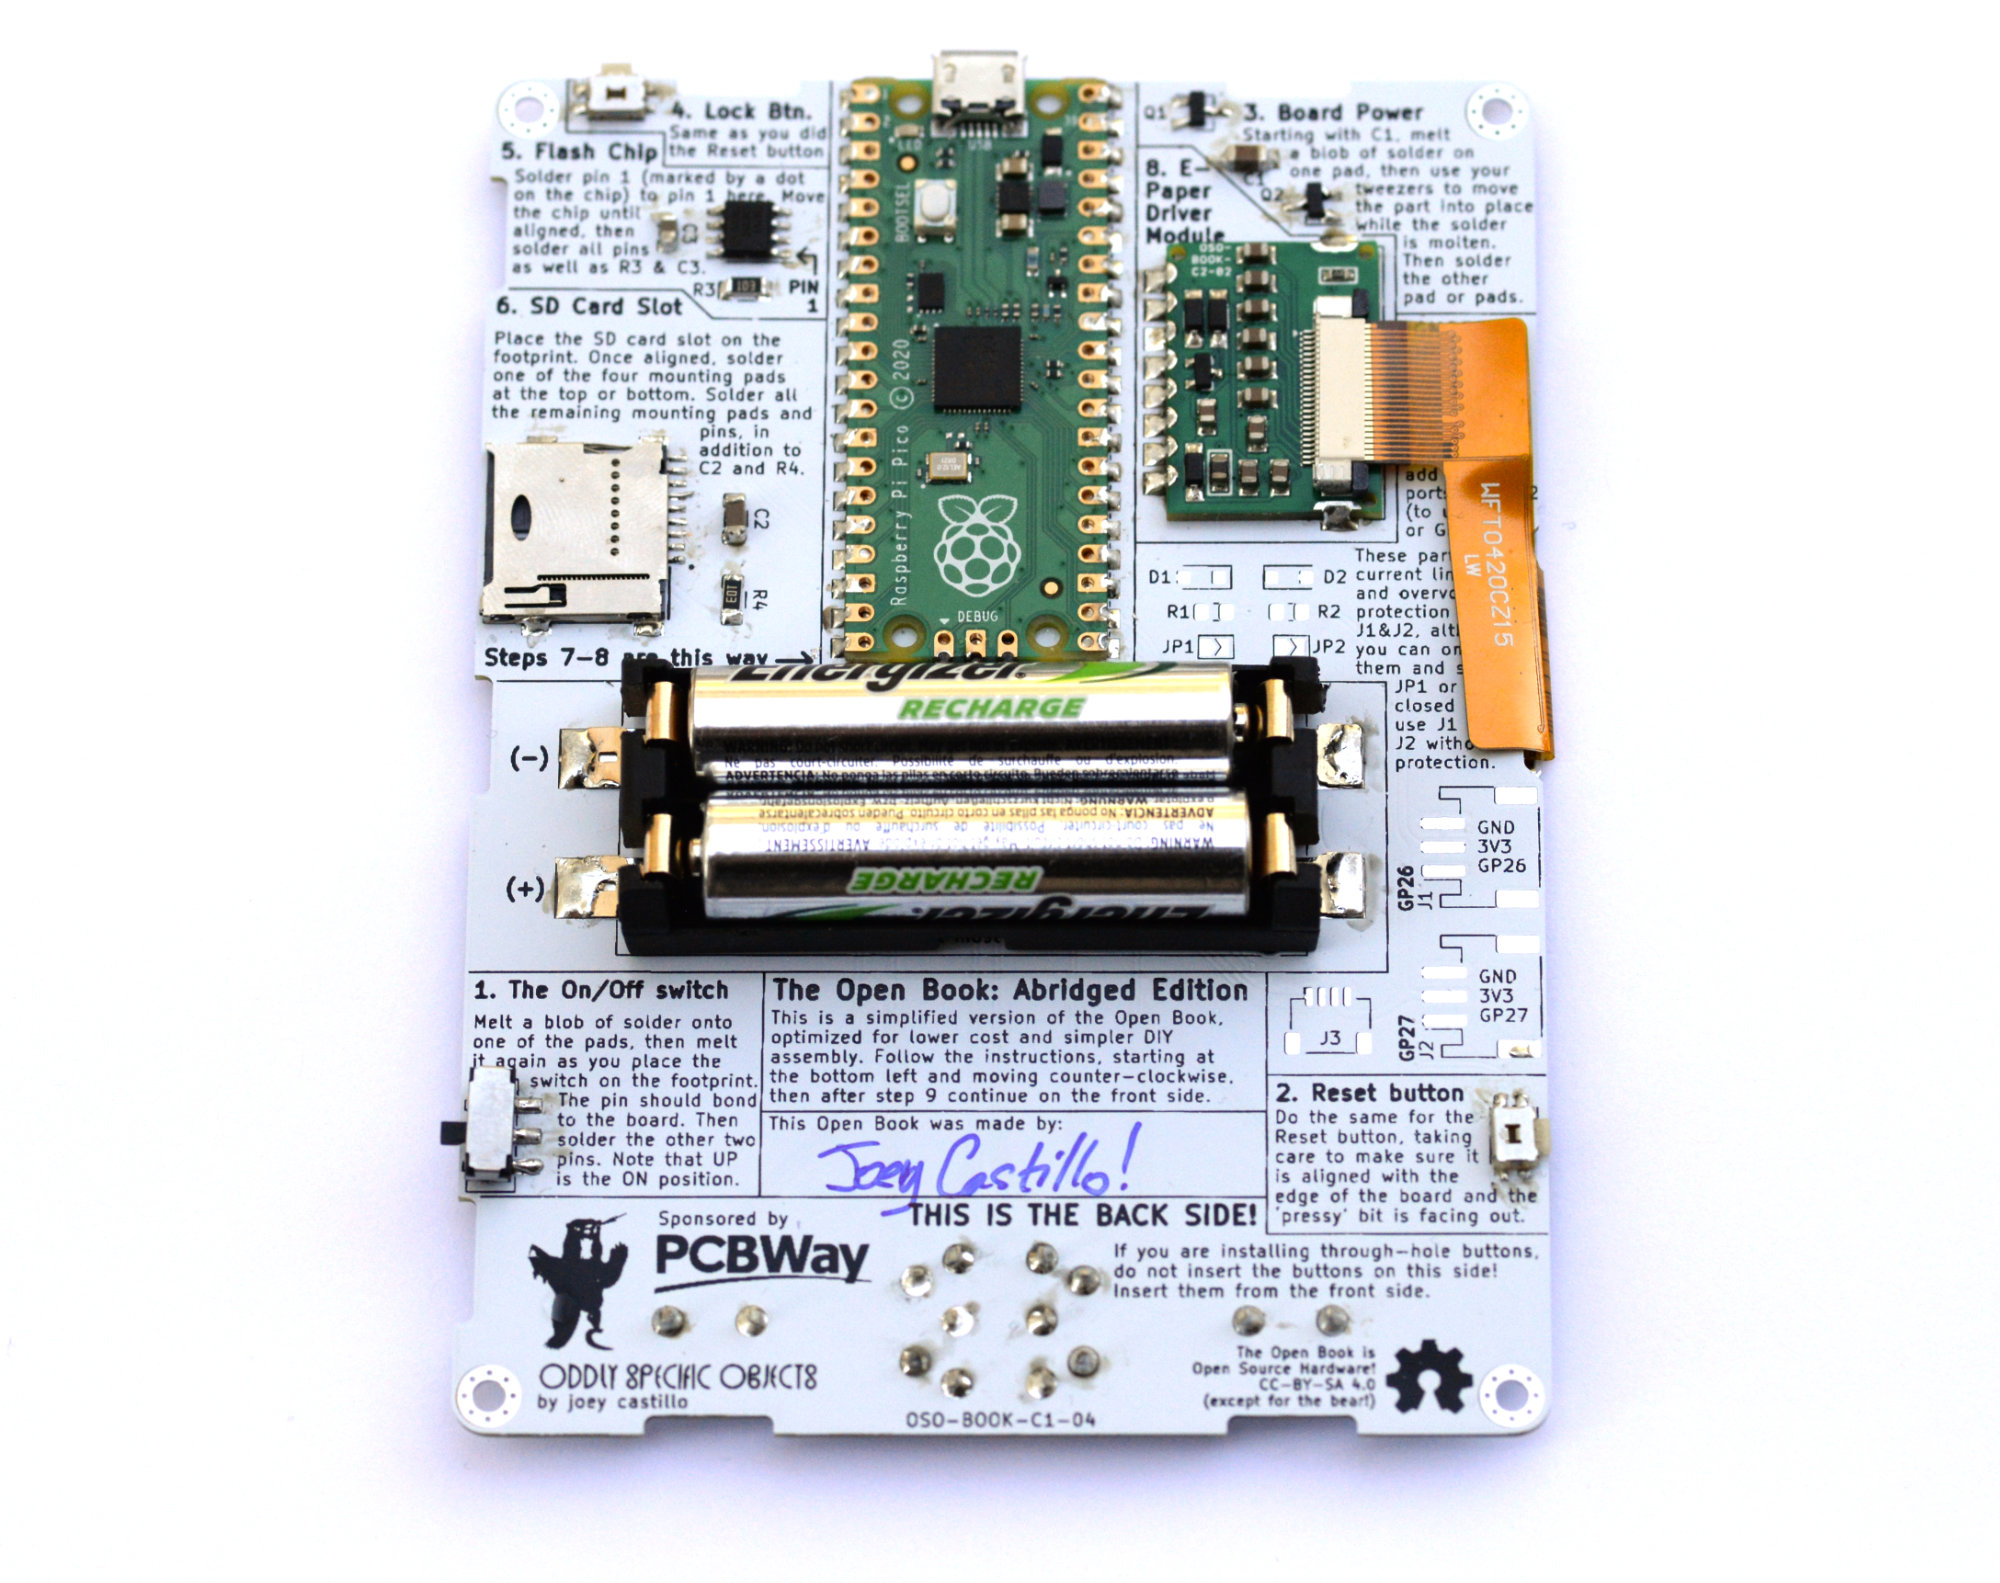
The Open Book’s part count is super low, and each part plays a critical role. The most central part is the Raspberry Pi Pico at the heart of the board. The Pi Pico contains, among other things, a microcontroller, a power supply and a USB port. It runs the show, handling all the ins and outs of being an e-book reader.
The power switch is tied to a pin on the Pi Pico that can disable the power supply. When this switch is in the OFF position, no power is flowing through the board’s circuits, which saves your batteries.
The buttons are also tied to pins on the Pico: the Reset button reboots the book, the Lock button locks the book, and the seven buttons on the front allow you to navigate the book’s UI.
The parts in the Board Power block do two things: first, they let current flow from the battery to the Pi Pico (which is how you use it when USB is not plugged in), and second, they let the Pi Pico power down some gadgets on the board when you’re not using them (which also saves your batteries).
The Flash Chip we’ll talk about more later. For now, know that it will contain bitmap fonts for all the languages of the world, and when your Open Book is displaying a page of text, it’ll be drawing the text with data from this chip.
The SD Card Slot is where you’ll put a MicroSD card containing the books you want to read!
Finally, the E-Paper Driver boosts the battery voltage up to the levels required to push ink around the e-paper display. It also contains that flex connector that you’ll use to plug in the e-paper display.
Bringing it all together: when you turn on your Open Book, the Pi Pico powers up the gadgets on the board, including the SD card, the Flash chip and the e-paper driver. When you ask for a page of text, the Pi Pico reads the next page of text from the SD card, then looks up all the font data it needs from the Flash chip. From there it talks to the display through the flex connector, telling it what to put on the screen. The display then turns on the e-paper driver, renders the page of text, and turns it back off, leaving the text you wanted to read on-screen until the display refreshes again.
Getting the Parts
You’ll need a few things to make the Open Book. I plan to make a limited number of kits with all of those things available on the Oddly Specific shop, but they’ll only ship within the United States, and it won’t be that many. The most common situation will involve you getting the parts and putting it together. To that end, you’ll need all the items on this list:
- The Open Book Abridged Edition PCB, fabricated in 1.0 mm thickness. You can have five of them fabricated at JLCPCB for under $20,
or you can buy one on the Oddly Specific shop(TODO). - The Open Book e-paper driver,
also available on the Oddly Specific shop(TODO). - All the parts on the
Open Book Abridged Edition BOM(TODO). This should be a one-click buy, except for: - This GDEW042T2 grayscale e-paper display, and
- A MicroSD card. You probably have one of these floating around.
Before we move on to assembly, a few notes on sourcing these parts:
- You might be tempted to buy a 4.2 inch black/white/red e-paper display. DON’T DO IT! These B/W/R displays take much longer to refresh, owing to the different formulation of ink in the panel. They’re fine for a display that updates every few minutes, but cannot refresh fast enough to turn pages in a book.
- The battery connector is the well-known Keystone 1022, which is almost $6 at Digikey. Expensive! Luckily it’s so well known that there are a ton of clones on Aliexpress; search for AAA SMT and you’ll find product pages like this one where you can get it for much cheaper, especially if you plan to make more than one Open Book.
- The E-Paper driving module
is available at the Oddly Specific shop, butyou can also have small quantities of it fabricated through JLCPCB or PCBWay. Instructions for this are available in the GitHub repository.
Assembling the Book
This section is going to be a bit intentionally short, because all of the instructions are printed on the PCB! Read the instructions on the front. Then start soldering components on the back, moving counter-clockwise from the bottom left. Just a couple of notes — again, printed on the PCB — that are worth calling out specifically:
- The Flash chip has a specific orientation. There’s a dot on the chip marking pin 1; it should align with the “Pin 1” marking and arrow in the Flash Chip block.
- Resistors are black on one side and white on the other. They all match up with components labeled “R” (R3, R4)
- Capacitors are beige, and they match up with components labeled C (C1, C2).
You’ll solder all the surface mount parts on the back, then solder all the through hole parts on the front, and finally plug the e-paper display into the flex connector in the e-paper driver module.
Finally, you’ll want to tape the display to the board. You can use double sided tape on the back of the display glass for permanent mounting, or you can tape the top and right sides of the display to the front if you think you may want to remove the display later.
Flashing the Firmware
The firmware for the Open Book is called libros. It’s a fairly standard PlatformIO project targeting the Raspberry Pi MBed core for Arduino. It’s very pre-alpha, and more work needs to be done here. There are (or soon will be) notes in the repository on how to contribute.
BUT FOR NOW, you can get started by flashing this firmware image to the Raspberry Pi Pico. The steps:
- With the power switch in the ON position, plug the Pi Pico into your computer using a USB cable.
- While holding the BOOTSEL button on the Pi Pico, press the Reset button once; then release BOOTSEL.
- A drive called
RPI-RP2will appear on your computer. Drag the book.uf2 file to this drive. At this point, the Pi Pico will reboot to an Open Book logo.
The Open Book requires a microSD card to function. If you don’t have a microSD card inserted, you’ll see a message instructing you to insert one.
If this is the first time you’re booting the Open Book, you may see either a progress bar, or another message about a file named “babel.bin”. Read on to the next section for more on that.
Flashing babel.bin (aka the language data)
The cornerstone of the Open Book is its ability to display texts in all the languages of the world. There are a lot of languages, and a lot of characters in the alphabets of those languages, which means a lot of data – and there’s not enough space to fit all that data in the Pi Pico’s program memory. The solution is the 2 MB Flash chip that you soldered while assembling your Open Book, and a library called Babel.
Babel is a lightweight Unicode text rendering library that can display bitmap fonts of up to 16x16 pixels. The babel.bin file, which you can download at that link, contains information about the Unicode Basic Multilingual Plane (BMP), as well as bitmap data from GNU Unifont, a SIL Open Font License bitmap font with 100% coverage of the BMP.
At first boot, the Open Book firmware looks for a file called “babel.bin” on the SD card. When it finds it, it copies the contents of that file to the Flash chip, a process that takes about a minute.
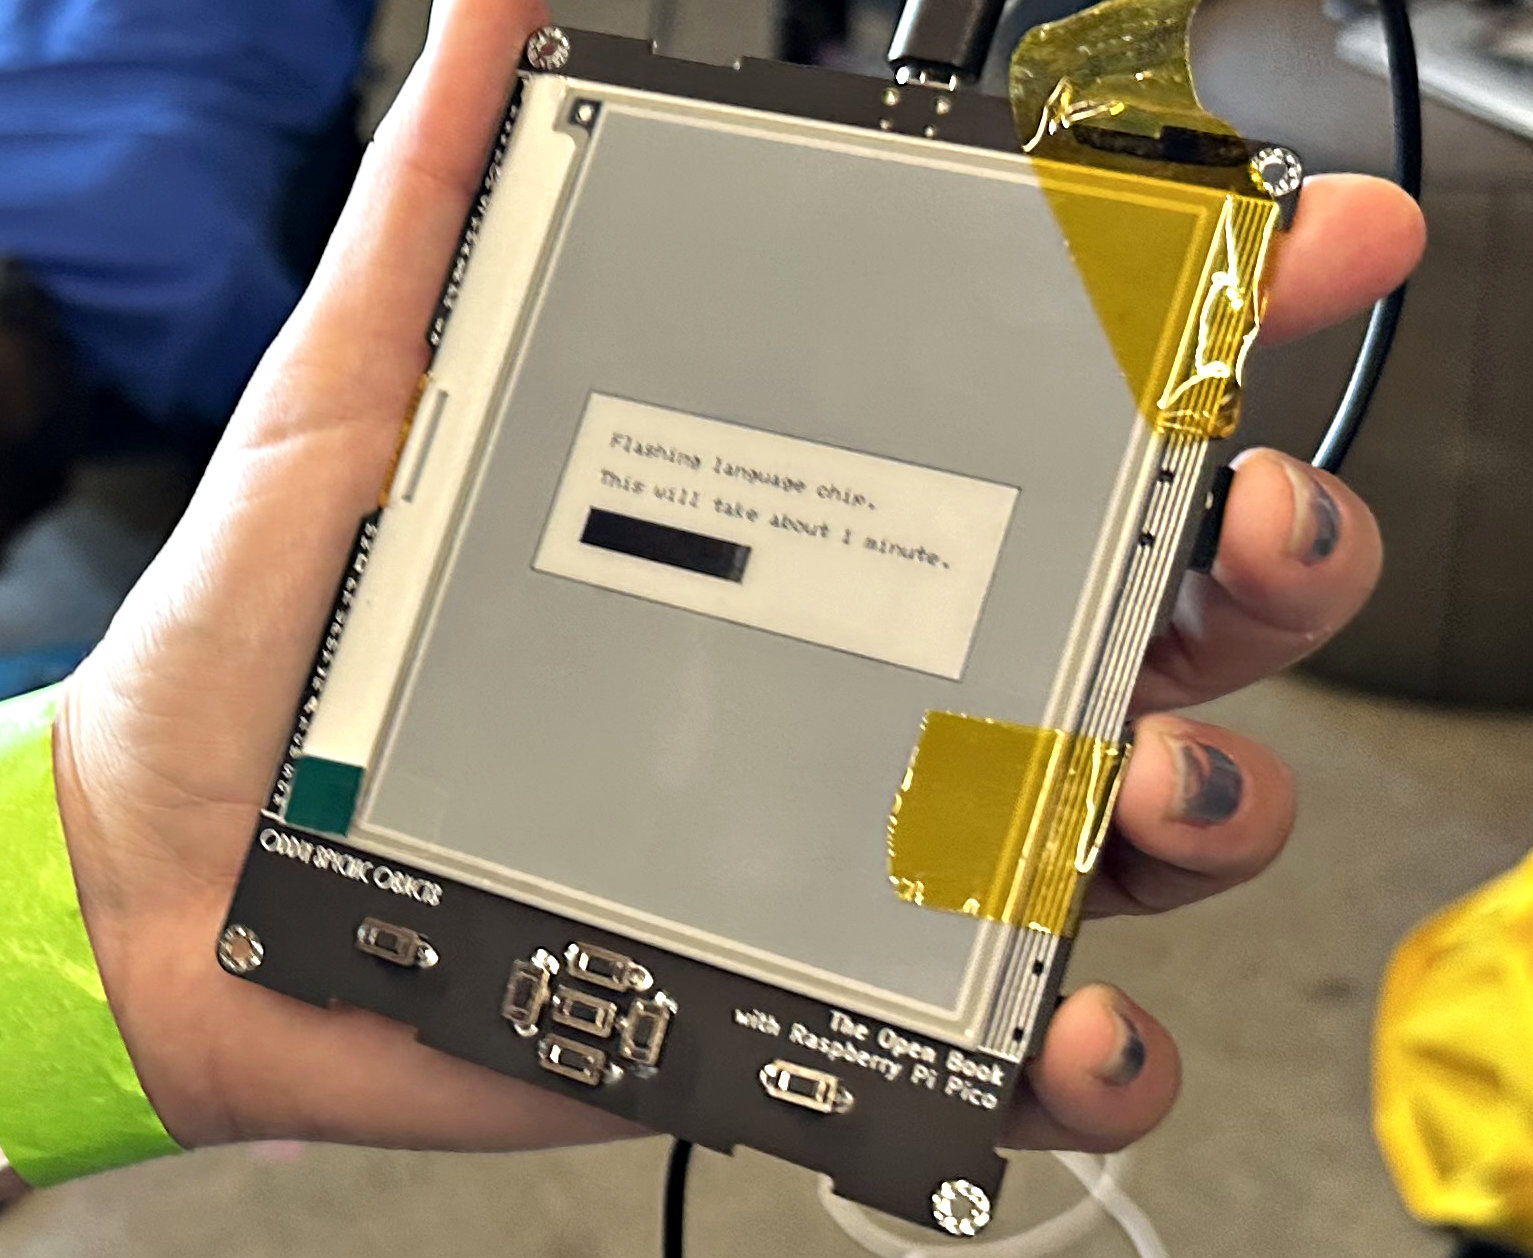
Once that process is complete, the Open Book will always have access to that font data; you can delete babel.bin to save space on your SD card. IMPORTANT: Don’t turn off the device until this process is complete.
Using your Open Book
From here you’ll want to copy some reading material to your SD card and read it. You’re probably wondering what formats the book supports, and the answer is simple: the Open Book supports a single file format. Plain UTF-8 text.
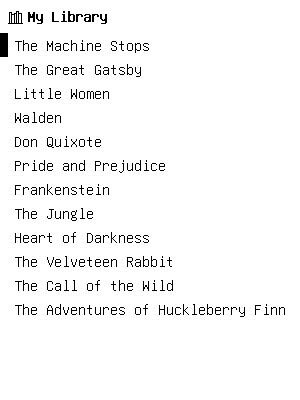
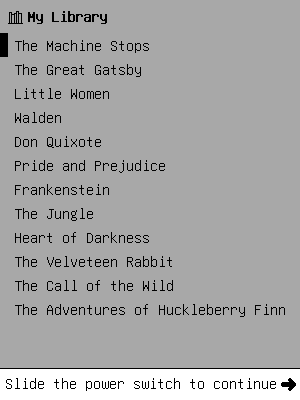
When using the firmware on this page, the Open Book’s main menu should display the titles of up to 15 works on the SD card (yeah I know, it’s all very pre-alpha). Any file with a .txt extension will be displayed, and by default the title will be the first line of the text file (up to 32 characters).
You can select a book with the Up and Down buttons on the D-pad, and open one with the center Select button. Once you’ve opened a book, the button at the far left is the “Previous Page” button, and the one at the far right is the “Next Page” button. You can return home with the center button, and the Open Book will save your progress (currently in a sidecar file, filename.obp).
When you are done reading, press the Lock button at the top. This powers down the Open Book’s peripherals and puts the Pi Pico into its DORMANT state, which is ok in terms of power consumption. Still, a banner will direct you to “Slide the power switch to continue”.
This is your cue to flip the power switch to the OFF position, which cuts all power to the board. Your book can last for months upon months in this state.
When you wish to resume reading, that same prompt will be your cue to slide the power switch to the ON position. This restores power to the book, and after a brief boot animation, returns you to the book list.
Simple Text Formatting
Paragraphs should be on a single line (the Open Book will word wrap for you) and have a single newline character between paragraphs; the Open Book’s text layout engine will use a tight leading for soft-wrapped lines of text, and add a small amount of space after a newline character to make paragraph breaks clear.
Also note that the first time you load a text file, you will get a dialog box informing you: “This book is not paginated. Paginate it now?” Pagination is, at this point, a time-consuming process that involves simulating the layout of the entire text file, noting the offset where each page begins and the amount of text that fits on the page. At this time, it’s stored in a sidecar file (bookname.pag), but eventually I’d like to make it part of a database. This process can take under a minute for a short story, or well over 20 minutes for a novel. In the short term I would like to add a progress bar to this modal; in the longer term, I think there is ample room for optimizing this process.
Finally, please note that at this time the pagination process is very fragile, so it can and may crash. If you see the Pi Pico’s green LED flashing, that means the core has hard-faulted, and you’ll need to reboot either via the reset button or by power-cycling the device.
Advanced Text Formatting
While the file format is plain text, if you want to get more fancy, you can.
Front Matter
I imagine the canonical format for books being plain text with a little bit of “front matter”: YAML-style key/value pairs at the beginning of a file to offer more details about the book. The format:
---
TITL: Frankenstein
AUTH: Mary Shelley
DESC: A tragic scientist creates a monster in his laboratory.
GNRE: Science fiction
LANG: en
---
<book text goes here>
This piece of the parser is somehow even more fragile at this point and can choke on a variety of inputs. Also, for now the keys have to be all caps and four characters exactly. I’d like to make this more robust in the future, but this works for now as a proof of concept.
Chapter Breaks
Also a proof of concept: you can break a book into chapters using the ASCII record separator character (U+001E). The idea here is to begin a line with the record separator, have a single line with the chapter title, and then continue with the text of the book:
---
TITL: Walden
AUTH: Henry David Thoreau
DESC: Thoreau’s report on his social experiment.
GNRE: Biography
LANG: en
---
Economy
When I wrote the following pages, or rather the bulk of them, I lived alone, in the woods, a mile from any neighbor, in a house which I had built myself, on the shore of Walden Pond.
<the rest of the chapter>
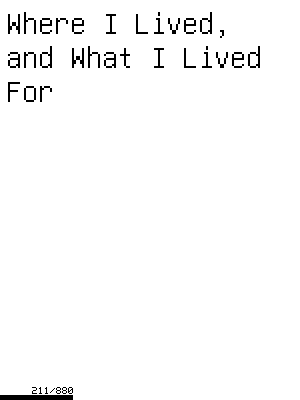
Where I Lived, and What I Lived For
At a certain season of our life we are accustomed to consider every spot as the possible site of a house.
In terms of text rendering, the record separator before the lines “Economy” and “Where I Lived, and What I Lived For” causes those lines to break the flow and render in a large font on their own page, separating a long work into sections.
At a later date, I hope to use these record separators to populate a table of contents, and perhaps even use the Group Separator (U+001D) and Unit Separator (U+001F) to create units and volumes!
Bold and Italic
Finally, you can use the ASCII Shift In and Shift Out (U+000E and U+000F) characters to format text in italic, bold and bold italic.
Hold up. What are Shift In and Shift Out?
The original purpose of these characters dates to old-school Teletype days; they provided a way to shift a coloured ribbon, usually red/black, up or down to the other colour. My reading is that it was a way to emphasize certain text: you could shift in the red ribbon, print something important, and then shift out to return to the black ribbon. Which makes it if nothing else semantically meaningful for emphasizing a word. Thus:
Text that is italic.
Text that is bold.
Text that is both bold and italic.
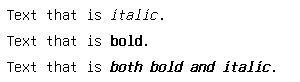
This may seem a bit painful to work with – although Visual Studio code does helpfully render these control codes with little red SI / SO blocks – but if you convert at least some ebooks using the tool in the next section, you’ll get this kind of formatting for free.
Converting Books to Text
It goes without saying that plain text isn’t a format you’re likely to find e-books in. Project Gutenberg has plain text books, but they’re hard-wrapped, which makes them a poor fit for the Open Book’s layout engine.
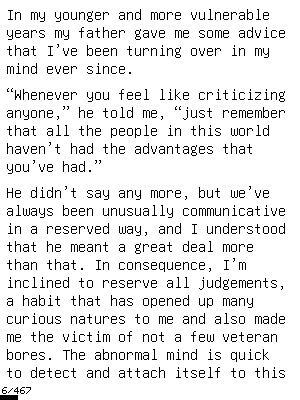
The simplest way to convert a book to a text file for the Open Book is to — wait for it — create a text file! It’s quite simple to start with the HTML representation of a book (like, say, The Great Gatsby), and simply cut and paste to create a text file with the title on the first line:
The Great Gatsby
by F. Scott Fitzgerald

I
In my younger and more vulnerable years my father gave me some advice that I’ve been turning over in my mind ever since.
“Whenever you feel like criticizing anyone,” he told me, “just remember that all the people in this world haven’t had the advantages that you’ve had.”
He didn’t say any more, but we’ve always been unusually communicative in a reserved way…
<rest of the book>
This will get you a simple but workmanlike e-book reading experience on the Open Book. Having said that, this doesn’t take advantage of some of the clever ASCII hacks mentioned above. For that, you’ll have to use the somehow even more experimental libros-convert utility. This utility is specifically designed to convert EPUBs from Standard Ebooks to well-formed Open Book-compatible ASCII text files. It will emit YAML-style front matter and chapters based on the names in the table of contents, and will even create formatting codes for bold and italic text. Gravy, right?
Well, not so fast. The Standard Ebooks folks are unusually good at making EPUB files, with consistently excellent markup and metadata. You might have a Gutenberg EPUB or a DRM-free EPUB that you want to convert, and there’s no guarantee that libros-convert will handle it well. Bottom line, libros-convert is great if the book you want to read has an EPUB on Standard Ebooks; otherwise, you might want to export to plain text from Calibre and work from there.
Conclusions
This is a weekend brain dump of the state of the Open Book project as of November 2022. I’ve been hacking on the book for three years now, and still it feels like we’re at the beginning of the beginning of the journey when it comes to software, documentation and support.
To that end: HELP IS WANTED. Libros needs help, or maybe it’s not great at all and we need to rewrite the whole thing in Rust. We need to figure out a robust database solution for managing readers’ libraries. And we haven’t even talked about Focus, the UI framework managing all of the views that make this possible. It’s in its infancy, and at the very least requires a mechanism for view controllers to talk to each other. We also need to get the table of books to be able to display more than one page of books, which is like a small detail, but one of yea so very many details that we’ll need to address to make this thing live up to the promise.
Bottom line: if you’ve made it this far, welcome to the cause.
Let’s build this book together.
- Joey